How to Split an Existing Mac HFS Volume
Overview
This is being provided primarily for users using our products Scannerz for Mac OS X and Phoenix for Mac OS X to allow them to take an existing volume and add another volume to it, however anyone needing to know how to add another volume to an existing hard drive may find it useful.
Prerequisites
About the only prerequisite is that you have a volume with enough free space on it to allow the creation of another volume, and that the data has been backed up. Although we’ve never seen this process end up ruining an existing volume, that doesn’t mean it can’t happen. As a general rule of thumb, if the volume being split has a bootable operating system installed on it, it’s best to have at least 16GB of free space available on that volume after the volume has been split. If you’re creating a Phoenix Boot Volume, we recommend that the minimum size of the volume be at least 20GB, although users using Lion or Snow Leopard may be able to barely get away with 16GB.
Procedure
The procedure requires using Disk Utility, which is included with the operating system and found in the Utilities folder. For this example, we will be taking an existing Time Machine backup drive and adding another volume. The process is simple, so we’ll describe it in a few steps.
Step 1. Start Disk Utility


Brought to you by Scannerz with Phoenix and FSE for the Mac OS X Operating System. If you have hard drive problems or want to evaluate your drive or system, click on the icon to the left for more information. If you would like to create your own operating system diagnostic drive or clone an existing volume to another drive without Scannerz, check out the standalone version of Phoenix for Mac OS X by clicking on the Phoenix icon to the right. Phoenix is included in the full versions of Scannerz.


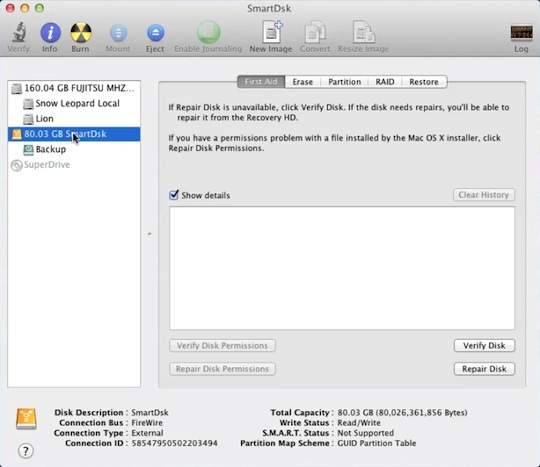
With Disk Utility started, it will display all the local drives and volumes on your system. If you’ve recently downloaded and installed some software, the DMG volumes associated with the packages may show up as mounted packages as well. To avoid confusion we strongly recommend ejecting any such volumes at this point.
In the figure above, the system is indicating two hard drives and three volumes. The internal hard drive has a size of 160GB and is split into two volumes named “Lion” and “Snow Leopard Local.” Notice the volumes are indented with respect to their hosting drives. The second drive is an external FireWire drive of 80GB in size and it currently has a single Time Machine backup volume on it named “Backup.” This is the volume that we will be splitting and adding another volume to.
Step 2: Allocate Space for the New Volume
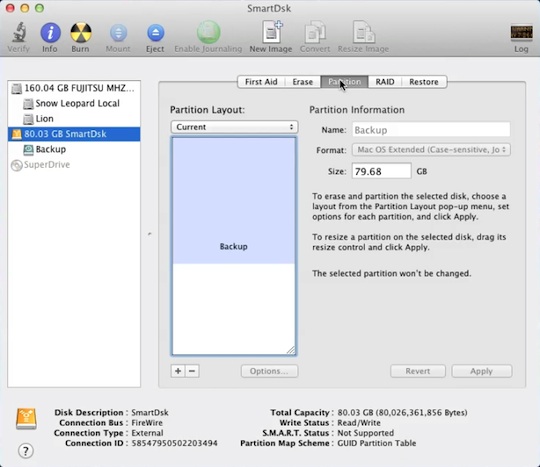
This step is performed by selecting the drive hosting the volume that you wish to split, not the volume itself. For the purpose of this example we want to split the Time Machine volume, so we select the drive named “80.03GB SmartDsk.” The display appears similar to the following:
After selecting the drive you wish modify, click on the “Partition” tab and the Disk Utility interface will change similar to the following:
When Disk Utility shows the volume, the light blue region indicates how much space the drive is using and in some cases a degree of allowable overhead.
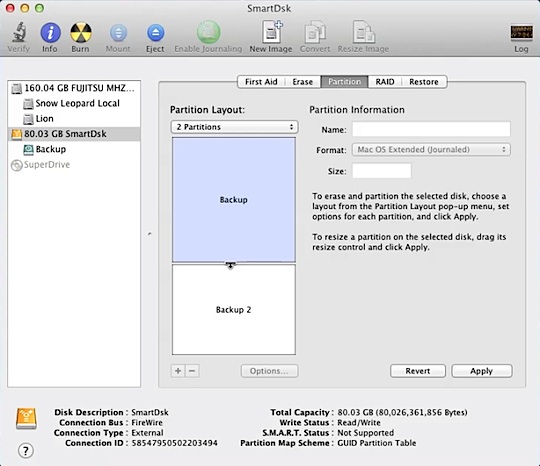
Click on the “+” volume as shown above, and the volume automatically appears to have been split. This now needs to be resized. Notice that in the image above there’s virtually no apparent free space left in the original volume, which isn’t a good idea. Also notice that Disk Utility has automatically named the second volume “Backup 2.” We’ll change all of this in the next few steps. It should be noted that the volume hasn’t really been split yet, this is just another step in the process.
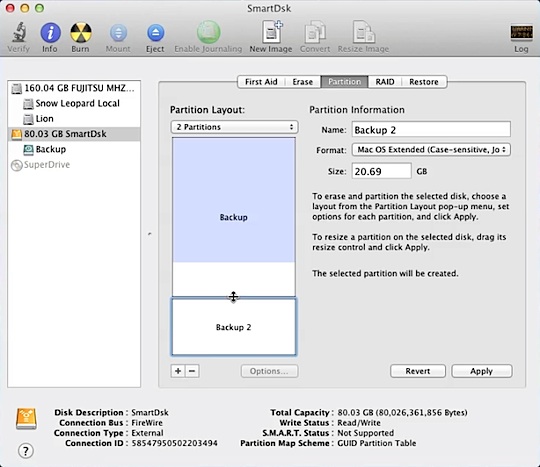
Place the mouse cursor over the split between the two volumes being identified. You can drag it down to allow the “Backup” volume to retain more space. When we’re done in this example, the display from Disk Utility is as follows:
We’ve resized the volume to allow the size of the volume currently named “Backup 2” to be 20.69GB, which is about the bare minimum we would recommend using for a Phoenix Boot Volume (32GB is the recommended size.)
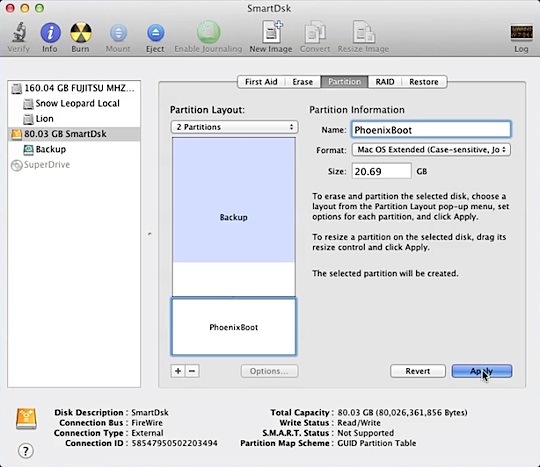
Step 3: Rename the volume, set the file system type, and launch the actual repartitioning
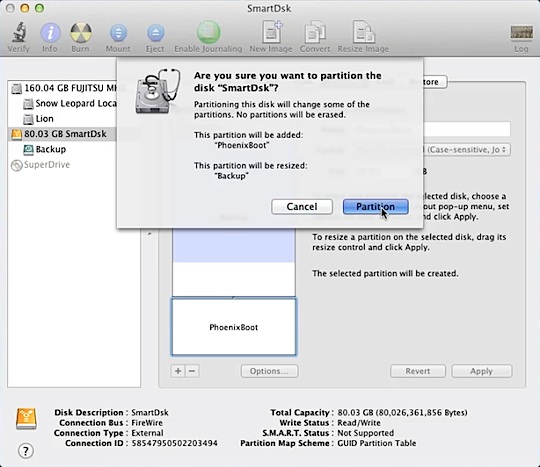
Click on the volume you wish to be the new volume. Fill out the name of the volume and select the format of the volume. The format of the volume for a typical Mac system will be either Mac OS Extended (journaled) or Mac OS Extended (case sensitive, journaled), but Disk Utility does allow MS-DOS, exFAT, and free space as other options. Once the name has been adjusted (above it’s been changed to “PhoenixBoot”) and the file system type has been selected, click on the Apply button. After the Apply has been clicked you’ll have one last chance to back out of the operation as follows:
If you proceed by clicking on the Partition button, the partitioning will begin. Be sure to read the text Disk Utility is displaying in the partitioning area for any warnings. Make sure it tells you that one partition is going to be added and the other resized. If you’re not careful in the preceding steps you might end up inadvertently deleting an existing partition. For our example, we’ll go ahead an click on the Partition button.
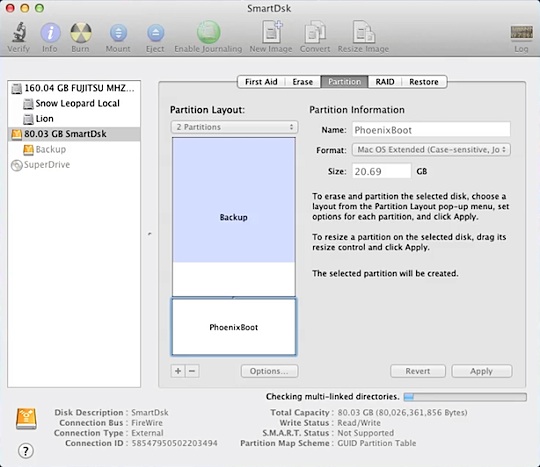
Step 4. Let the partitioning proceed.
We’ll assume that the Partition button has been pressed. After that occurs, about all that’s left to do is let Disk Utility do it’s job. A progress bar along with text will describe what’s happening to the left of the progress bar. This is illustrated in the following image:
The partitioning process can take a considerable amount of time, depending on how much free space is left on the original volume (“Backup” in our example) and how big the original volume is. Disk Utility is re-indexing the original volumes contents and moving files around so they fit in the newer, smaller volume. It’s possible that this operation may fail, and if it does you likely won’t be able to split the volume. If the operation fails, DIsk Utility will set the volume back to it’s original settings, meaning the actual partitioning operation didn’t take place. Disk Utility must resize the original volume and move everything into its new storage area before it creates the new volume.
Assuming the operation succeeded, your new volume has been created and should be ready to use. You can close Disk Utility and start using your new volume.