Cloning a Mavericks, Mountain Lion, or Lion Volume with
Phoenix or Disk Utility
What is Disk Cloning?
Disk cloning is the process of making an exact copy of the contents of one volume on a drive and putting them onto another drive. This process is very easily done using Disk Utility or our product Phoenix for Mac OS X. This document will describe how to perform cloning using both applications.
In this document we will refer to the volume being used as the source of the cloning procedure as the source, and the volume that will receive the copy of the source will be the target.
Why Clone a Volume?
Many people make the mistake of thinking that a cloned drive is the same thing as a backup. It isn't. A backup typically does what it says, it backs up the contents of a volume or drive to another volume or drive, but there are considerable differences between the two as follows:
1. A cloned volume is an exact copy of the original target drive. Backups may, depending on configuration, only copy partial contents and will not typically include the Recovery volume. Phoenix will not create the Recovery volume, but Disk Utility will. Phoenix can, however, create a Phoenix Boot Volume, which is essentially a recovery volume with one critical difference: instead of having a few tools, the entire core operating system is present.
2. A cloned volume verifies the integrity of the target volume ensuring the data is copied properly, some backup utilities don't.
3. The cloned volume is bootable whereas a typical backup isn't unless the backup has multiple volumes with at least one being a bootable volume.
4. Backup software sometimes, once again depending on the type and the settings, can make incremental backups, thus allowing the user to retrieve an earlier version of something, such as a program, document, illustration, etc. that a user might be working on. A cloned volume will only store what is on the source volume at the time the clone was made.
So why clone a volume? Most often to make a bootable drive or volume that can be put into use in the event that the main drive on a system fails. Many people do daily backups, and then, less frequently, clone a bootable (primary) volume less frequently. Some people simply use the cloning process as the backup. It's really up to the user.
When Shouldn’t You Clone a Volume?
The Disk Utility method should not be used to clone a volume if any of the following conditions exist:
• The hard drive is failing and has bad sectors
• The hard drive has been rendered read-only due to indexing problems
• Files are missing or corrupt
Cloning a volume using the Disk Utility method will not fix a volume with problems. In fact, all you will be doing is wasting your time duplicating the same problems by copying them onto another drive. The Disk Utility method uses block copying, and instead of generating a new volume index as files are copied it will replicate the old index. If this index is corrupt, the cloned volume will have the exact same problems as the original volume. Additionally, if bad sectors exist on the drive, even if they don’t contain data, the Disk Utility method will fail to complete, possibly wasting a considerable amount of time.
Phoenix for Mac OS X uses file copies instead of block copies. File copies have the benefit of generating a new volume index as the files are copied, while also effectively defragmenting the drive. If a volume has indexing problems and has been rendered read-only, Phoenix may (note emphasis - may) be able to recover the drive in its entirety. Additionally, a Phoenix clone doesn’t require that the target volume be at least as big as the source volume, only that the target volume has enough free space on it to store the contents of the source volume.
If you wish to verify that the source of your volume is in good working order before attempting a clone, we offer the Scannerz line of drive and system testing products. Scannerz Lite is a simple, low cost, scanning tool that will tell you if your drive has problems. Scannerz with Phoenix and FSE or FSE-Lite are our fully featured products which allow thorough drive testing and analysis and also include Phoenix and either FSE or FSE-Lite. If you would like to learn more about our Scannerz line of products, click HERE.
What's Required to Clone a Volume?
Prior to cloning a volume, and depending on whether or not you wish to do this using Disk Utility or Phoenix, the following requirements need to be met:
1. Recovery Volume Requirements
Disk Utility: The source volume, which should be your primary Lion or Mountain Lion volume must have the Recovery volume installed on it. Unless there was some oddity that occurred during installation, it should be there.
Phoenix: Phoenix can clone a working volume without the need for install media or a Recovery volume. However, during the cloning process the user shouldn’t be using the system for anything. Phoenix will not create or copy a Recovery volume (a Phoenix Boot Volume if you decide to create one, is a recovery volume, but with much greater capability).
2. Target Volume Size Requirements
Disk Utility: The target volume must be at least as big as the source volume. This is critical. If the target volume isn't as big as the source volume, even if it's only off by a few kilobytes, the cloning process won't be allowed to start using Disk Utility.
Phoenix: The only requirement is that the target volume has enough free space to store the contents of the source volume. Remember, if using the Disk Utility method, and you transfer to a target volume that’s bigger than your source volume, you won’t be able to clone it back to the original volume unless you resize the partition so it’s smaller or the exact same size as the recipient. This problem doesn’t exist with Phoenix.
3. Partition Format Requirements
Disk Utility: Cloning with Disk Utility will completely over write the entire drive and there will be nothing left of the original contents of the target drive after cloning is complete. Cloning with Disk Utility is not a backup or copy procedure, it's an overwriting procedure. When using Disk Utility, it will essentially duplicate the format of the source volume.
Phoenix: Cloning with Phoenix is a copy procedure and the contents of the drive will not be overwritten unless they’re redundant. However, the format of the source and target volumes must be the same.
4. Partition Scheme Requirements
This applies to both Disk Utility and Phoenix: The target volume should be in the same partition scheme as the source volume, which generally means it should be a GUID partition scheme since we're focussing on Intel based Mac's.
5. Time Requirements
Disk Utility: Disk Utility is going to duplicate each and every block on a volume, even if the block doesn’t contain data. It will generally take as long using Disk Utility to clone a volume that’s 30% full as it will to clone a volume that’s 90% full. For standard hard drives, expect the process to take about 1minute per gigabyte.
Phoenix: Phoenix only copies existing files from the source volume, thus the amount of time it will take will vary on how full the source volume is. Generally, expect it to take about 1 minute per gigabyte of used space on the source volume.
Naming Convention Note: We strongly advise against using names for the target volume that are identical to the source volume but separated by a space followed by a number (for example, “Lion” and “Lion 1”.) The reason this can be problematic is because the OS can automatically append a digit to an existing volume with an identical name even though the volumes may have completely different content. Several applications can become confused by this. We recommend using a descriptive name for the clone or, if you insist on using numbers, put no spaces between the original name and the numeric identifier.
If you use Disk Utility instead of Phoenix to perform cloning operations, at the end of the cloning process, Disk Utility will exhibit this exact behavior - your cloned volume will have the exact same name as the source volume. After the system boots up, we recommend changing the name of either the source or target volume as soon as possible.
For the remainder of this article, we'll be using Phoenix to clone a Lion (MacOS 10.7) based volume, and Disk Utility to clone a Mountain Lion (MacOS 10.8) based volume. The procedures will be identical in each case regardless of the operating system being used. Additionally, Phoenix may be used to clone volumes and operating systems from OS X 10.5 (Leopard) through 10.8 (Mountain Lion.)


After starting in this mode, the system, by default, will put the volume that is designated as the last primary boot volume in the center. Although the image above shows three different drives, it's actually one drive. The FireWire drive we're going to use as the target doesn't show up here because it's not a bootable volume (yet) and any other volumes that aren't bootable will not show up as well.
You can, at this point, select which volume to boot by clicking on the drive icon and then the up-arrow underneath it, at which point the system will start booting. If our target drive was already successfully cloned, it would show up in this list as well. As seen in the following screen photo, we've clicked on the Recovery 10.8.2 but have not clicked on the up-arrow yet.

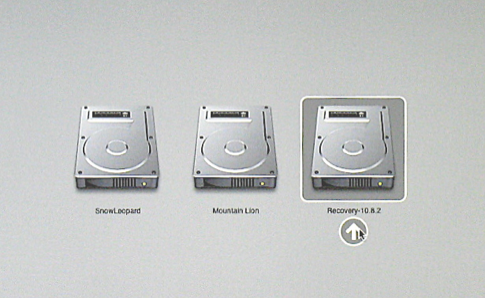
After clicking on the up-arrow underneath the Recovery 10.8.2 icon, the system will start booting. When booting is complete, you will be presented with a list of tools, and you'll want to select Disk Utility from the list.

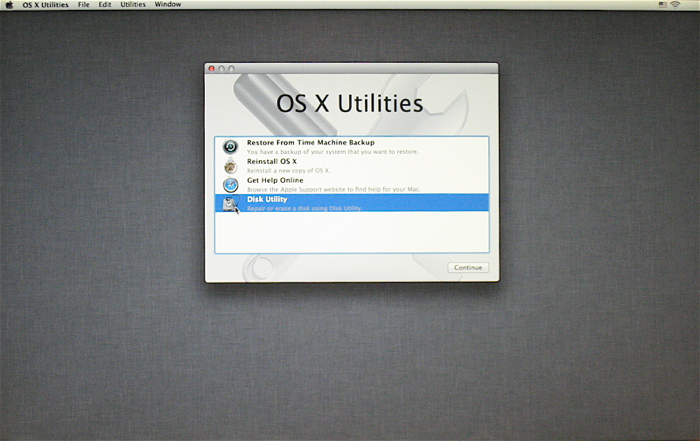
After Disk Utility starts, you'll be presented with its user interface with nothing selected as shown below.


The order of the disks and volumes will obviously vary from system to system, but in our case the internal hard drive on the system is a 160.04GB hard drive with two volumes named SnowLeopard and Mountain LIon. The item named disk1 is the Recovery partition, which holds the Mac OS X Base System. The 80.03GB external FireWire drive with the label 80.03 GB SmartDsk is the drive holding our target volume, currently named New Backup. The volume labeled SuperDrive is the optical disk, which is empty.
After Disk Utility comes up, click on the target drive you want to clone, which in our example is the volume named Mountain Lion. This needs to be done to bring up the available operations that can be used on a volume, namely First Aid, Erase, RAID, and Restore. After clicking on the Mountain Lion volume, we click on the Restore option along the upper end of the user interface. The following screen shot illustrates what it looks like:
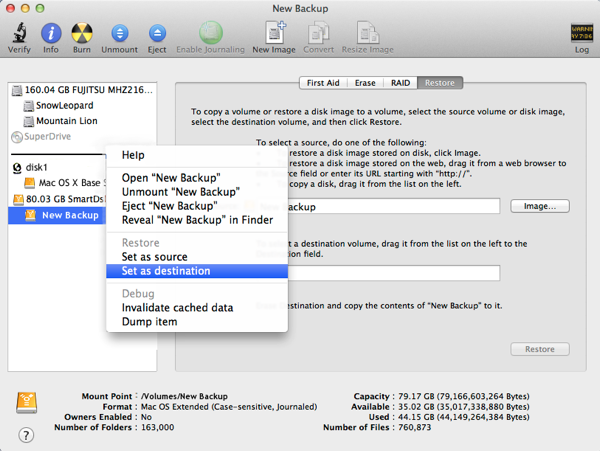
The next part is about the only part that's tricky in this process, because Disk Utility's interface, in our opinion, is a little bit buggy. You now need to select the target volume, but if you do so it might end up putting it in the place of the source volume, or you might end up, if not careful, selecting the wrong volume all together. We recommend putting the mouse cursor over the volume that you wish to be the target volume, which in our case is the volume named New Backup, right clicking (or control clicking if you're using an older mouse/input device) and selecting the Set as destination option from the list as shown in the following screen shot:
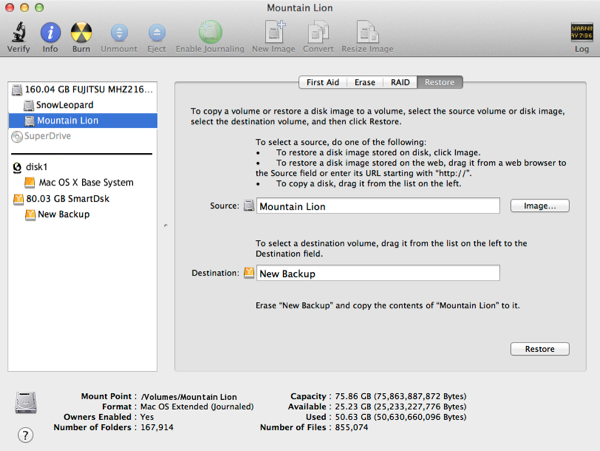
You may also need to re-do the same for the source volume by repeating the procedure but using the Set as source option by right-clicking (control-clicking on older input devices) on the source volume, which in our case is the volume named Mountain Lion. Although this might sound silly or simple minded to some, re-check everything!!! Once the cloning process has begun you'll be wiping out all data on the selected target drive, and if you're not careful or you've inadvertently selected the wrong source or volume, you may very well be very, very sorry!
The following screen shot shows both the proper source volume (Mountain Lion) and the selected target (New Backup) properly selected:
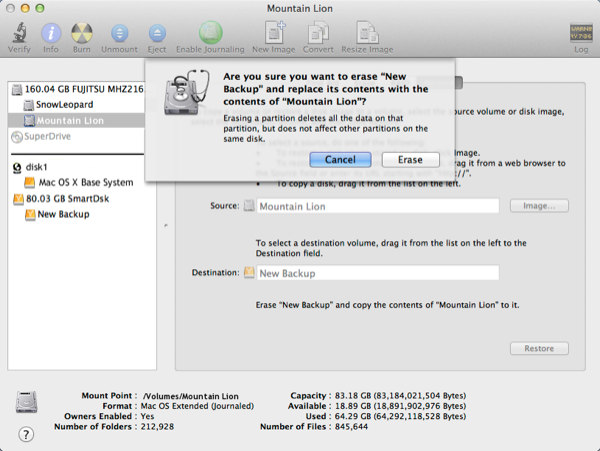
Once the source (Mountain Lion) and target (New Backup) have been selected, the only thing left to do is click on the Restore button. After clicking on the Restore button, you will given one last opportunity to back out of the process as shown in the following screen shot:
Re-check your selections one last time, and if ready to proceed with cloning, click on the Erase button. If you decide not to proceed, click on the Cancel button and nothing will happen. Once the cloning procedure has begun, it must run to completion. You cannot interrupt it and restart it. If it's stopped for some reason in the middle of cloning the target drive will likely be left in an indeterminate state. Remember that this procedure will likely take a long time.
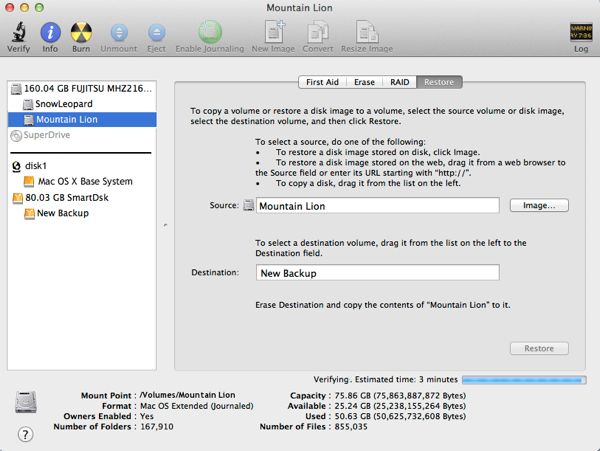
During cloning, the progress of the operation is illustrated by the progress bar located in the lower right hand corner of the user interface. The wording accompanying the progress bar will indicate the operation being performed. Initially, it will list the amount of time left and indicate that it’s in the process of copying blocks. After copying is complete, it will go through the verification process. This process is repeated for both the actual volume being cloned, followed by the recovery partition. During this time, the labels for the source and target drives in the list of drives and volumes on the left half side of Disk Utility will be grayed out because the drives aren’t accessible. In the screen shot below, the verification process is underway with about 3 minutes remaining.
When verification is complete, the cloning process will be complete, and the cloned volume will now be an exact duplicate of the target drive, including name and Recovery volume. The volume formerly known as New Backup now has the name Mountain Lion. Disk Utility doesn’t present any fanfare, such as dialogs or windows popping up to announce the successful creation of the cloned volume. Unless monitoring the process, the only way to tell will be that the progress indicator in the lower right corner corner of Disk Utility will be gone, and the target volume will now have the same name as the source volume. The screen shot below illustrates how Disk Utility appeared when the cloning process was complete. Notice that cloned volume is now named Mountain LIon as well.


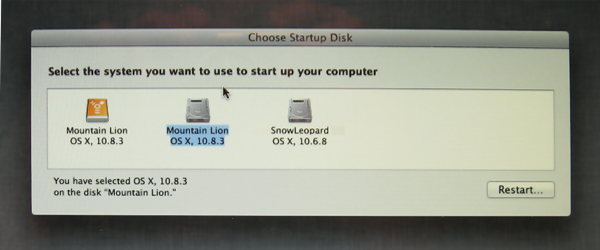
To test out your new cloned volume, quit Disk Utility and you will be prompted to select a boot volume. When the list comes up, your cloned volume will be there. Notice this takes you out of recovery mode, and Recovery volumes aren't listed. We suggest that you boot from it and test it out. It might also be a good idea to give it a different name to reflect that it’s the source volume. The photograph below shows our list of bootable volumes, including the newly cloned FireWire volume, now named Mountain Lion.
That's about all there is to cloning a volume in Mountain Lion using Disk Utility.
Questions? Comments? Suggestions?
Thank you for your interest. If you have any questions or comments, please feel free to drop us an e-mail using any of the contact addresses found using the About section of our web site which can be found at the top of this page. To see some more of our How-to documents, click HERE.
Brought to you by Scannerz with Phoenix and FSE for the Mac OS X Operating System. If you have hard drive problems or want to evaluate your drive or system, click on the icon to the left for more information. If you would like to create your own operating system diagnostic drive or clone an existing volume to another drive without Scannerz, check out the standalone version of Phoenix for Mac OS X by clicking on the Phoenix icon to the right. Phoenix is included in the full versions of Scannerz.


Cloning a Volume using Disk Utility
The cloning process using Disk Utility consists of the following steps:
1. Boot into the Recovery volume.
2. Select Disk Utility as the tool to use from the opening menu.
3. Select the volume to be cloned from the list of available volumes presented by Disk Utility.
4. Select the target volume.
5. Clone the drive.
To start off, you need to boot into the Recovery volume. This can be done two ways:
1. Simultaneously press and hold down the Command-R key combination immediately after turning the system on. This will boot the system directly into the recovery mode and present you with the list of available tools without presenting you with a list of available drives.
2. Press and hold the option key immediately after powering the system on. This will present you with a list of available, bootable volumes.
For this article, we used option 2 because it exposes all the bootable volumes available on the system. In our test case, the 160GB drive on the system has three bootable volumes, one named Mountain Lion, which holds MacOS 10.8 (Mountain Lion), the Recovery volume for Mountain Lion, and one named SnowLeopard which holds MacOS 10.6 (Snow Leopard.) We feel this is the better way to boot into a recovery volume because it lists all volumes sequentially from left to right and if you ever need access to your cloned volume, this is the way it can be selected.
After booting up using option 2 above, we are presented with the following:
Cloning a Volume using Phoenix
When cloning a bootable volume that is mounted and in use as the primary, bootable drive, we strongly recommend the following steps be taken:
1. Stop all other applications, and don’t use the system until the cloning process is complete.
2. Using System Preferences, disable Spotlight indexing on all drives. Spotlight will just slow you down.
3. Consider creating a Phoenix Boot Volume to perform this operation.
4. You should either have a freshly formatted target volume with enough free space to hold the contents of the source plus a recommended 32GB of free space for overhead and OS expansion, or you may also clone onto another volume that has data on it already. In the latter case, be certain that the target volume has enough free space to accommodate the source volume and that the formats of both the source and target volumes are the same (MacOS extended, Journaled, for example.) Keep in mind that if clone over a volume with existing data, Phoenix will overwrite redundant files.
A note for Leopard (MacOS 10.5) users: If your operating system is Leopard (10.5) you MUST manually disable ownership on the target volume. This is done by right clicking on the volume from the desktop, selecting “Get Info”, and when the information panel opens up, make sure that the “Ignore ownership on this volume” option is not checked. This option is located at the very bottom of the information panel. This only applies clones where the operating system being cloned is Leopard.
Procedure
The procedure to clone a volume is incredibly easy, and consists of nothing more than the following steps:
Step 1. Stop all active applications
Step 2. Navigate to the Applications then double click on the SCSC folder to open it.


As you can see, in this case the SCSC folder is for the fully featured version of Scannerz for Mac OS X, which also includes Phoenix and FSE. Double click on the “Firebird” icon representing Phoenix and the application will begin to launch. Needless to say, if you purchase a standalone version of Phoenix, FSE and Scannerz and their documents will not be present.
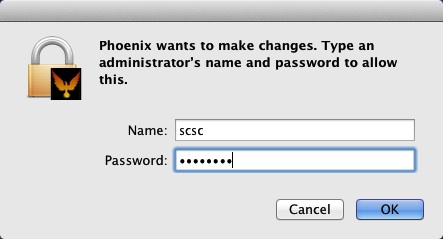
Step 3. Enter the admin user ID and password (usually you) in the dialog that opens when Phoenix is launched.
Phoenix needs to run with administrative authority. The “Name” field is usually the system owner and will almost certainly be different from “scsc.”
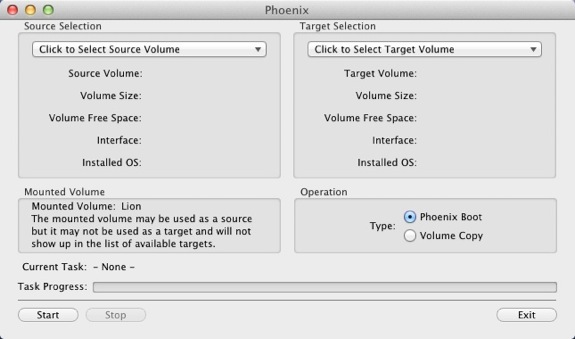
Step 4. Wait for Phoenix to launch. When it does it will appear similar to the following:
The user interface shown above will appear after Phoenix has recognized all the volumes in the system. If you’re having a drive or volume problem this may cause Phoenix to take a prolonged period of time to show up. In normal circumstances, it should appear within a few seconds.
The upper left boxed area in the user interface will be where you select the source of the clone. The upper right boxed area in the user interface will be where you select the target volume. The boxed area in the lower left will identify which volume you’re currently using as your boot volume. The lower right boxed area is where you will tell Phoenix what type of copy operation you’re going to use.
Step 5. Select the source volume using the Click to Select Source Volume pull down list.


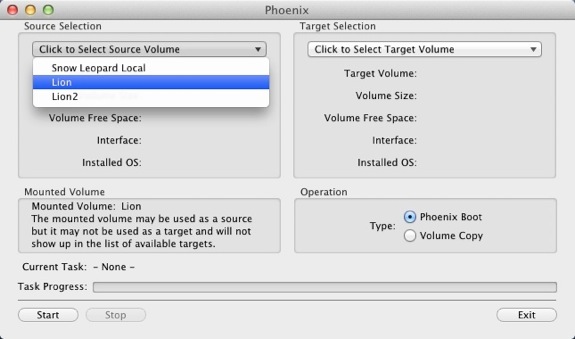
Notice that in the image above, the information about the source volume has been filled out since it’s been selected. Additionally, the mounted volume never appears as a target. This is to prevent accidental overwriting of the active (booted) operating system.
Step 7. Select the type of operation.
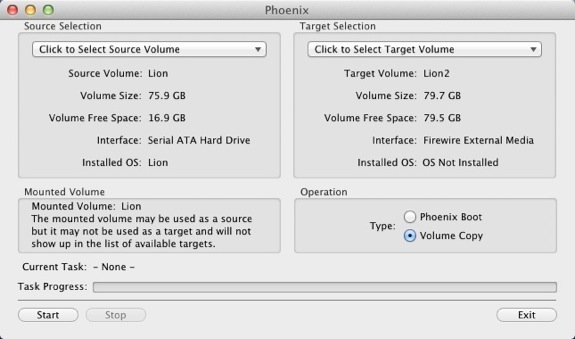
The type of operation is selected by clicking the option in the lower right boxed area of the user interface. By default, this is set to make a Phoenix Boot Volume. We don’t want a Phoenix Boot Volume, we want a Volume Copy (clone) of the source volume, so we click on that option to change it.
Notice that the upper right hand boxed area now shows information about our target volume.
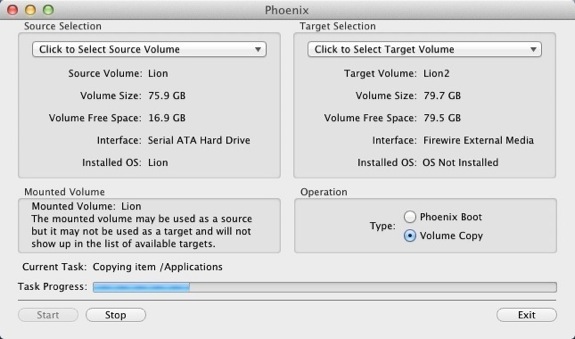
Step 8. Start the copying (cloning) operation by clicking the Start button.
Once the cloning process has begun, the task bar will start indicating the progress being made. The text above the progress bar will indicate the operation that’s being performed. When the cloning process is complete, the progress indicator will be filled and the task text will inform you that the operation is complete.
Some notes about operating Phoenix while it’s in it’s cloning process:
1. If the Exit button is selected, a dialog will appear warning you that an operation is underway which will allow you to back out of the exit operation. Exiting Phoenix abruptly may leave the target volume in an unstable state. A more graceful way to exit is to click the Stop button first, wait for the operation to complete, then click on the Exit button.
2. If the Stop button is selected, Phoenix will not stop immediately, it will complete the operation it’s performing before stopping. If Phoenix is stopped, it can’t be re-started where it left off. Phoenix will provide you with warning dialogs allowing you to back out of the operation.
3. The progress indicators move based on tasks Phoenix performs, not the number of bytes transferred from one volume to another. Some items will complete very quickly, and others, such as copying the Applications or Users folders may take very long.
Step 9. Reboot using the new volume.
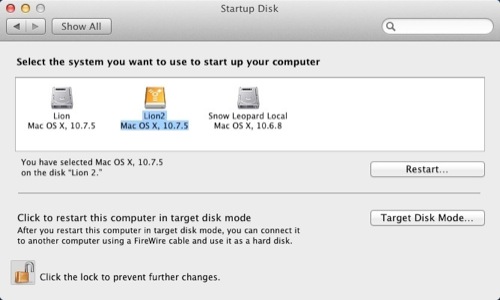
To reboot using the new volume, open System Preferences and select the Startup Disk option. For our example, this appears as follows:
As seen above, we’ve highlighted the newly cloned volume named “Lion2” from the list of drives. All that’s left to do is click on the Restart... button, and proceed to reboot the unit. The first time the newly cloned volume is booted, it will likely take a little longer than normal to boot, but after the first boot, it should act just like your original source volume.
Your cloned volume is now ready to use!
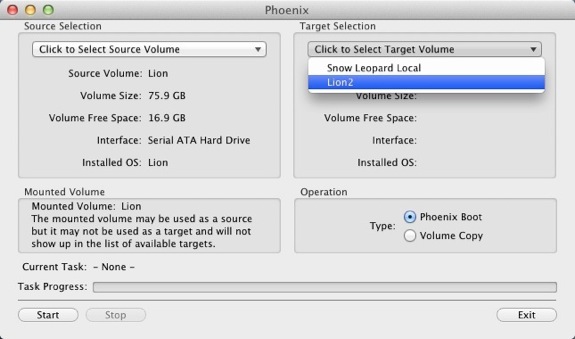
In this session, we’re going to clone the actual volume that’s being used as the boot volume, which is named “Lion.” Once this item is selected, the information about the volume will fill in telling you all the information about the volume. We will be using the volume named “Lion2” as the recipient of the source’s contents. This particular system has two partitions on it’s internal drive named “Lion” and “Snow Leopard” and an external drive has a single volume named “Lion2” on it.
Step 6. Select the target volume.