Overview
This document is intended to illustrate how to use Scannerz
for Mac OS X to perform system, hard drive, and SSD testing to
identify problems that will range from the simple and
straightforward to those that are much more difficult to
isolate. Many people think Scannerz is a drive testing
application, probably because the vast majority of problems Scannerz
detects are related directly to surface defects on hard drive
platters or bad blocks in an SSD. However, Scannerz is
not simply a hard drive testing tool, it’s properly described as
fault detection software. Surface scan problems are simply one
of the faults Scannerz is capable of detecting.
Scannerz uses the progress of a surface scan over media
(the surface of a hard drive or the blocks in an SSD) as a
reference to help isolate problems with a system. Media related
problems are always repeatable until corrected. For example, if
a bad sector exists on a hard drive starting at the byte
location 34,359,738,368 with respect to the start of the drive,
it will remain at that exact same location unless corrected. If
on the other hand, Scannerz detects problems (or faults)
that occur inconsistently with respect to the progress of the
scan, then they usually lie somewhere else in the system. Other
products on the market often miss faults completely, or in some
case misidentify them as media problems when such problems don't
exist.
With the introduction of Scannerz Version 1.7 and
beyond, Scannerz introduces a new mode known as Diagnostics
Mode. With Diagnostics Mode the user will be
able to do the following:
- Confirm the existence of bad sectors on a hard drive or bad blocks on an SSD.
- Confirm the existence of weak sectors on a hard drive.
- Detect seek problems with a hard drive.
- Detect data corruption occurring between the drive and the system
- Detect memory problems and system bus faults
- Detect and identify abnormally long operations such as head parking events and timeouts
- Help isolate possible cable and connector problems
Scannerz is not intended to simply tell you whether a
drive or SSD has problems, it's been designed and packaged to
help users find the root cause of problems. As you'll see during
the rest of the document below, many problems may manifest
themselves with symptoms similar to drive problems and yet have
nothing to do with the actual drive itself.
The Testing Process
The common way to use Scannerz is to perform a Normal
Mode test on a drive or system, and if Scannerz
has flagged some problems or areas of concern, use Diagnostics
Mode to evaluate them. In some cases, such as excessive
data corruption or system lock ups, Diagnostics Mode may
be used directly without the need for a Normal Mode
test.
For reference, the following screen shots show Scannerz
Normal Mode and Diagnostics Mode interfaces.

A surface scan test underway in
Normal Mode
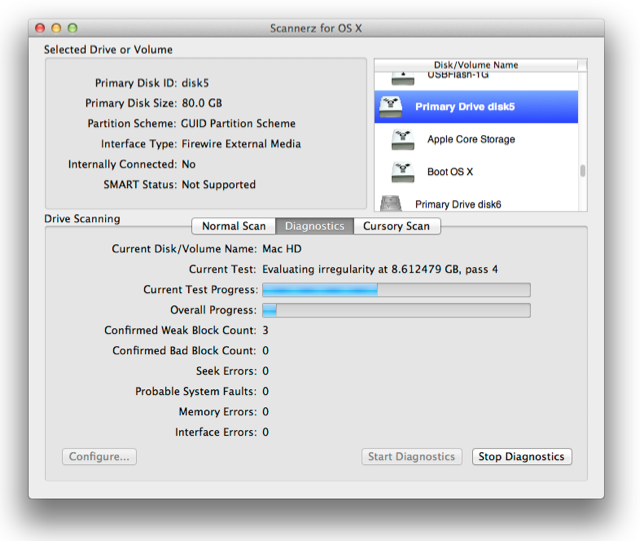
Scannerz in Diagnostics
Mode performing tests on a weak sector
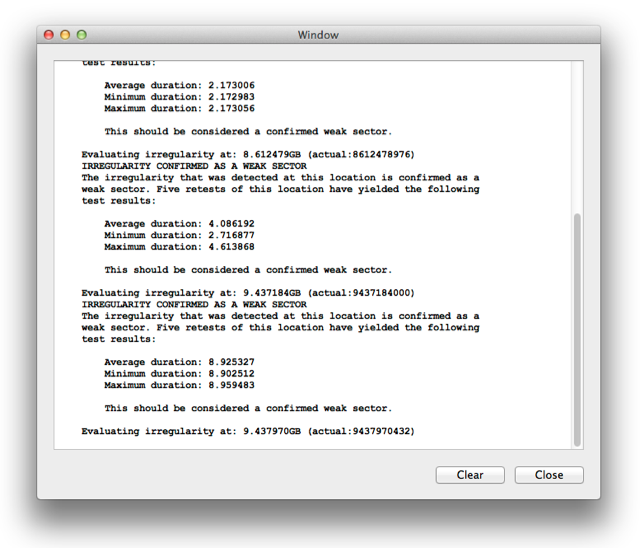 The
Logging window may be brought up in any tests to provide
details about tests. In this screen capture, Scannerz
is in Diagnostics Mode and evaluating a drive with
some obvious problems.
The
Logging window may be brought up in any tests to provide
details about tests. In this screen capture, Scannerz
is in Diagnostics Mode and evaluating a drive with
some obvious problems.

Diagnostics Mode tests may be configured to analyze errors and irregularities detected in previous tests, perform interface tests, and perform memory and system bus tests.
A Note About Using a Phoenix Boot Volume for Testing
Scannerz includes a product named Phoenix, which
can create what's called a Phoenix Boot Volume and perform
volume cloning. We strongly recommend creating a Phoenix Boot
Volume on a secondary volume, or creating one on a 32GB (or
larger) USB Flash drive. In the creation of the boot volume, all
SCSC products will be transferred, as will the core operating
system. Third party applications and user folders will not be
copied into a Phoenix Boot Volume, but Phoenix can clone entire
systems as well, if needed. This volume may become invaluable in
the future if your system ever experiences a crash rendering the
original boot media unusable. Note that some older PowerPC based
systems cannot easily boot from a USB device.
Sources of Problems with a System and How Scannerz
can Isolate Them
Performance and functional problems with a system can often be
traced to one of the following:
- Bad sectors/blocks on a hard drive or SSD
- Weak sectors on a hard drive
- Intermittent connections
- Data corruption
- Memory defects/System bus problems
- System timeouts
- Drive timeouts/excessive head parking
- Lack of memory
- Lack of free space on a drive
- Excessive MDS (Spotlight and Time Machine) indexing
- Software problems
The list above is not a list of every possible problem on a
system, but rather a list of the most likely problems one may
encounter.
Bad sectors/blocks on a hard drive or SSD will be flagged
during a Normal Mode test using Scannerz, and
confirmed using Diagnostics Mode. The symptoms of the
problem(s) will depend on how active the faulty region of the
media is. If the problematic area is in the boot code of the
drive, the system may fail to boot. If it's in an application
file, the file may fail to load. Both hard drives and SSDs are
capable of remapping bad regions to "spare" regions if they
exist.
Weak sectors should generally only occur on a hard drive.
A weak sector is a damaged, but readable sector. It typically
takes a fairly long time (often seconds) for the drive to read
such a sector. A weak sector in a hard drive will be identified
as an irregularity in a Normal Mode test, and confirmed
as a weak sector in Diagnostics Mode. Symptoms are long
periods of spinning beach balls any time the sector is
encountered by the system. A weak sector can be every bit as
problematic as a bad sector.
Intermittent connections may be detected in Normal
Mode tests as errors, irregularities, or both. An
intermittent connection is typically found in an I/O cable but
may be caused by faulty connectors as well, and even cracked or
marginal logic board traces. Unlike bad or weak sectors, these
problems never correlate to the progress of the surface scan
with any degree of consistency. When Diagnostics Mode is
used to evaluate data from a Normal Mode scan that
contains this type of problem, it will flag the problems as
being potential system faults. Putting the system into
Diagnostics Mode and performing prolonged interface tests
on the unit will likely expose the problem as probable system
faults may be registered by Scannerz during interface
testing.
Data corruption occurs when data being transferred
between a drive or SSD and the system is corrupt. The symptoms
will be files that are garbage filled and often the need to
repair the media using Disk Utilities "Repair Disk" mode, to
correct the inevitable indexing problems. This type of problem
may or may not be detected in Normal Mode testing,
depending on the cause. It will be detected in Diagnostics
Mode testing and registered as an interface error. This
problem will most likely occur in external drives that are
either under-powered or have failing stages in their conversion
of data between a hard drive and an external interfaces. This is
a critical error, especially if the drive is a backup drive.
Memory defects and system bus problems are two totally
different things, but they are both evaluated in Diagnostics
Mode using the Memory Test option. If a system has memory
problems such as bad memory, incompatible memory, or poorly
seated memory, Scannerz Diagnostics Mode will show this
as a memory error. These may or may not show up in Normal
Mode tests as intermittent faults. System bus problems
will likely show up as intermittent irregularities or errors in
a surface scan, with the exception that they will occur during
all tests on all devices. This will be because the faults are on
the logic board, not a device such as an external or internal
drive.
System timeouts, drive timeouts, and prolonged head parking
events can be caused by a drive or the system. Timeouts will be
detectible and identified in Scannerz Diagnostics Mode
because such events typically have no correlation to surface
scan progress but they occur with roughly identical durations,
such as +/- a few tenths of a second. If the timing event occurs
only during tests on a specific drive, then the drive is to
blame. If the problems occur regardless of what drive is being
tested, it's likely caused by a logic board problem. The most
likely cause of such a logic board problem is poorly seated or
loose heat sinks on the logic board. Some low power drives
designed as backup drives may exhibit this behavior by design -
that's apparently just the way they work.
Lack of memory and lack of free drive space cannot be
detected by Scannerz, but they can be detected by a tool
included with Scannerz named Performance Probe.
Lack of free drive space is the more critical of the two because
the system will be unable to swap memory to and from the drive.
Aside from causing excessive bottlenecks, in extreme cases, this
may cause the system to shut down or lock up. A lack of memory
is most often caused by too many applications running at a time,
or the system simply doesn't have enough memory to adequately
run even the core operating system. If there's too little
memory, you will likely experience very slow loading of
applications, long delays in application execution, excessive
swapping, very high CPU utilization, and large changes in the
size of the swap files.
Excessive MDS indexing can be notorious for slowing a
system down. MDS, which stands for meta data server, is used by
both Spotlight and Time Machine to index drives on the system. Scannerz
once again, can't monitor it, but it does have a provision to
unload the MDS process from running while a test is going on. Performance
Probe, which is included in the Scannerz package,
will likely indicate high CPU and I/O utilization. We offer
another product named SpotOff which can be used to control MDS
indexing, and a free MDS monitoring tool named Spot-O-Meter,
which may be obtained HERE.
Software problems cannot be checked with Scannerz,
but if there are bad kernel extensions present
it can tend to skew not only some of Scannerz test
results with a fair number of false irregularities, but may
bottleneck the system, cause slow boot ups, and possibly system
crashes. By instruction, you're supposed to stop all
applications from running while Scannerz is performing a
test, however there may be things going on that you're unaware
of. For this reason, Scannerz also includes an
application named FSE or FSE-Lite (depending on the package)
that may be able to expose operations going on in the
background, particularly those generating excessive file system
activity. Performance Probe may also be of use dealing with such
a problem as it will indicate what seems to be inexplicable
system loading.
How to Test With Scannerz
As stated previously, the normal way to use Scannerz is
to perform a Normal Mode test, end to end on the drive
or volume you wish to evaluate, and proceed with Diagnostics
Mode tests if Normal Mode tests found errors or
irregularities. Many people check their systems periodically
using Normal Mode simply to confirm that their system
and drive are in good working order. Even in the event there are
no problems, it may be wise to run tests on both the memory and
interface in Diagnostics Mode simply to confirm that
everything is OK. Diagnostics Mode tests of the
interface and memory may also be needed if you're having erratic
system problems, but a Normal Mode test made no
indication of problems. The rest of this document will focus on
problems and how to identify and isolate them.
Diagnostics Mode has three test options which are
illustrated in the configuration dialog of Scannerz
above. The dialog allows the user to select three different
types of tests. The Analyze Errors and Irregularities option
will access test data from a Normal Mode scan and
evaluate it. It has an optional parameter to perform an
historical analysis (or not), with an historical analysis
evaluating all data acquired during testing since the original
tests were performed on a given device (recommended). If this
option is “Off” then only the data from the last Normal Mode
test will be performed. The Perform Interface Tests option will
exercise the entire interface between the media and the hosting
system. The Perform Memory Tests option will evaluate the system
memory and system bus for possible problems. The interface and
memory tests do not require data from a Normal Mode
scan, since they are intended to be used when problems have
already been detected.
The Analyze Errors and Irregularities Option
When the option to analyze errors and irregularities is
selected, the following will be identified if present:
- Bad blocks or sectors
- Weak sectors
- Timeouts and excessive sleep events
- Abnormally long irregularities, which usually point at a system problem of some sort
In reality, if problems are found, the majority of them will
likely be repeatable, directly associated with the progress of
the scan on the hard drive or SSD, and manifest themselves as
bad blocks/sectors, weak sectors, or a combination of both.
Dealing with and possibly correcting them is detailed in the
users manual for Scannerz.
If Scannerz identifies possible timeouts, it will be
necessary to determine if they're being caused by the system or
the drive. This can usually be accomplished by using another
scan target, such as a USB flash drive or another, different
external drive as the target and then performing interface tests
on that drive for a fairly long period of time (for example,
increment the interface test counter to a fairly high value like
1000.) If the timeout is being caused by the system, they will
continue to occur on each and every drive tested. If they are
associated with the original drive, they will only occur when Scannerz
is testing that particular drive. If the cause of the timeout is
the system, either there are some very intrusive and
dysfunctional kernel extensions in the system, or the logic
board has problems. Drive timeouts may be caused by controller
resets, firmware bugs, overly aggressive head parking, or
(believe it not) apparently by design on some low power drives.
Timeouts never correlate to the surface scan progress.
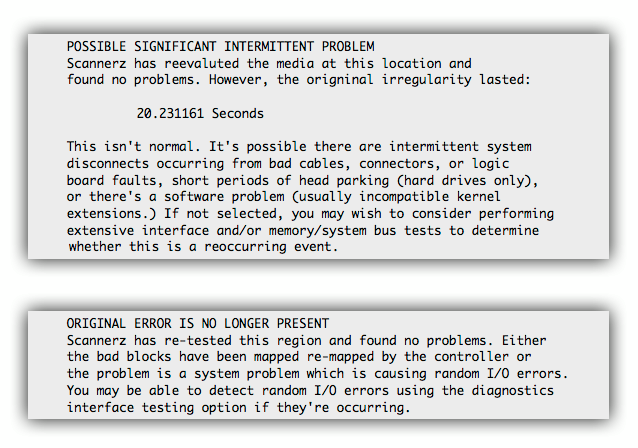
Abnormally long irregularities with inconsistent durations will
be called out in Diagnostics Mode as a potential
problem. The presence of such irregularities typically indicates
an intermittent connection of some sort. They will not correlate
to the progress of the surface scan, indicating the media on the
drive or SSD is not the problem. These are not timeouts, because
timeouts will always have relatively consistent durations. An
example of such an event might be irregularities detected with
durations of 10.33 seconds, 5.21 seconds, and 8.91 seconds.
Intermittent problems of this nature typically vary widely in
duration and at random with respect to the surface scan
progress. Problems of this nature may be evaluated and possibly
isolated using interface tests using a technique known as "Path
isolation." Path isolation is described in a later section of
this document (scroll down to find it.)
The Perform Interface Tests Option
This is the primary option used to evaluate intermittent
(erratic) problems with systems as well as to identify possible
corruption between the system and the media. The evaluation of
erratic intermittent errors and/or irregularities was described
in the preceding paragraph and will be detailed in more depth
later in this document (path isolation.) This leaves data
corruption, which is an extremely serious problem.
If interface tests are performed on a volume and interface
errors are found, it indicates that the data being transferred
between the system and the storage medium cannot be trusted.
This is particularly important if the drive exhibiting the
problem is a backup drive.
To illustrate this type of problem, suppose you saved a file to
a hard drive or SSD that contained the sentence "My dog has
fleas." If you re-read the file from the drive or SSD and what
you get back is "M*&dog~has fleas " this is data corruption.
Clearly the data sent to the storage device and what was
received are not consistent.
When tests are run using Scannerz in this mode and this
type of error is detected, it will increment the field
"Interface Errors" (see the figure titled "Scannerz in Diagnostics
Mode performing tests on a weak sector" above to see the
field.) Even a single instance of this error should be taken
seriously. This type of problem will eventually cause indexing
problems which will become evident by notices that the drive
needs to be repaired with Disk Utility. Eventually, the drive
may be rendered "read only" or may even be marked as unusable by
the system. If this was a backup drive (the one that's supposed
to be reliable) this is obviously a very serious problem.
The Perform Memory Tests Option
This option differs from all other test options in Scannerz
in that it doesn't utilize I/O between the system and a drive.
This is essentially designed primarily to expose system faults,
load the CPU, memory, and system bus, and verify memory
contents. During this test it is not uncommon for the system to
run an higher than normal temperatures, and cooling fans may
kick on or increase their speed.
If an error is detected in this test, the field in the user
interface named "Memory Errors" will increment. If errors are
consistent, as in they repeat each time an iteration of the test
is performed it indicates a likely problem with memory. For
example, each time an iteration of the memory test is performed,
and you get three errors every time, it indicates that the
memory itself has a problem. If the memory errors are erratic,
appearing occasionally but inconsistently, it implies that
either the logic board has problems or something connected
directly to the logic board such as an Airport card, RAM,
bluetooth card, keyboard, or trackpad (to name a few) may either
be poorly seated, malfunctioning, or improperly connected. Do
not assume the logic board is dead and needs to be thrown out
without first investigating all possibilities.
Using Path Isolation to Identify System Problems
Using Scannerz Diagnostics Mode interface testing
option, isolating intermittent and erratic problems can be
greatly simplified using a technique know as path isolation.
Intermittent and erratic problems are often difficult to trace
and can cause side effects nearly, if not identical, to bad
sectors or blocks on media. It should be noted that the problems
detected to qualify for this type of evaluation should be
inconsistent errors during surface scan tests or irregularities
detected with durations greater than 3 seconds.
The most likely causes of intermittent errors and/or
irregularities, in order of likelihood, are the following:
- External I/O cables and connectors
- Damaged connectors on the logic board used to connect external drives
- Damaged connectors on the interface boards of external drives
- Internal drive cables and connections
- Poorly seated logic board components such as Airport cards, internal cables, RAM, etc.
- Damaged RAM chip connectors on the logic board
- Cracked logic board traces (most prevalent on laptop computers)
From the list above, items 5 and 6 should become evident using
the memory/system bus testing option previously described, and
won't be dealt with in this section.
More obscure, but possible causes of intermittent errors and/or
irregularities are the following:
- Power supply problems
- Intermittent faults inside an external hard drive enclosure
- Intermittent faults on an actual hard drive or SSD itself
- Intermittent faults inside another system component, such as a keyboard or trackpad
- Thermal sensors on the logic board or drive
From the list above, items 1, 4, and 5 should become evident
using the memory/system bus testing option previously described
A path is said to be isolated when inconsistent errors and/or
irregularities are isolated to a single path.
Note the following important points:
A. Many older Macs use a USB “hub” controller chip, and
if problems exist with connections between this chip and the
system’s I/O controller, it’s likely problems will show up on
all USB ports and devices connected to it. This is actually a
logic board problem. You may also encounter problems with other
devices connected to this chip, such as the keyboard or
trackpad. If possible, obtain a block diagram of your logic
board to see if it fits into this category.
B. If there’s a problem related to the internal hard
drive support circuitry, such as a cable, and the internal drive
is being used as the boot drive, errors and/or irregularities
will likely show up on all tests of all I/O ports. The best way
to verify this is to use another, external boot drive, such as a
Phoenix Boot Volume, and launch tests using the internal hard
drive as the target. If the problems end up being isolated to
the internal hard drive, then the path should be considered
isolated to that path. Internal hard drive cable problems,
especially on laptops, should be considered the most likely
cause of such problems.
C. Mac Pro’s, Power Mac’s, and some MacBook Pro’s and
aluminum PowerBooks use I/O cards that host several I/O ports.
If there’s a fault in the cable connecting the I/O card to the
logic board, errors and irregularities will likely show up on
tests of ports associated with these cards, but not on any other
ports in the system.
D. Power supply problems are rare on laptops, but may be
more likely in desktop units assembled and sold between 2002 and
2010. This is because of a “capacitor plague” that existed in
this time frame. The market was apparently flooded with poor
quality capacitors that would lose their filtering capacity and
allow spikes into the circuitry of a system. In some cases such
spikes or transients may cause chips on the board to reset, or
see data as invalid and enter a cycle of retries. Eventually the
capacitors will fail completely causing the unit to malfunction.
Laptops typically don’t use capacitors of this type because
they’re too large to fit on the logic board. Problems of this
nature will appear very erratic and system wide.
E. If, during the process of path isolation, all problems
are pointing at the logic board as the source of the problems,
you should not assume the logic board is bad. Poorly seated or
loose connections in the logic board may be the cause of the
problems. Common problems are loose or improperly seated RAM
chips and Airport cards.
F. During the process of path isolation, particularly on
externally connected devices, remember that the cable itself is
a possible source of problems. For example, if you’re having USB
problems, and you test each and every USB port using a device
with a faulty USB cable, you might assume your problems fit into
those described in item A above, when in fact the cable is
causing the problem. USB ports can be tested with a USB flash
drive as well as a hard drive, although their slower response
may introduce a few more false irregularities.
G. True logic board faults are most likely to exist in
iBooks, Titanium PowerBooks, Aluminum PowerBooks, plastic
MacBooks, and MacBook Pro’s without machined aluminum housings.
These systems are susceptible to logic board flexing which can
in turn create cracks in logic board traces. This doesn’t mean
problems can’t occur on other systems, it’s just not as likely.
Path isolation is performed as follows:
1. A Normal Mode scan is performed on a device, and
errors and/or significant irregularities have been detected.
These types of results will not be confirmed as weak blocks or
sectors during Diagnostics Mode re-evaluation of the
Normal Mode tests. Diagnostics Mode will likely
log messages using one of the following formats:
2. Select Diagnostics Mode and a volume on the
drive where the problems were encountered. Set the increment for
testing fairly high (such as 1000). Select only the option to
perform interface testing as the only option. Click on the
"Start Diagnostics..." button.
3. If the unit is external, while the test is running, see if
moving the cable around, particularly near the junction between
the cables and connectors can induce faults. If the drive is
internal and you can open it up and gain access to the drive
cables, the same can be done using a non-conductive probe. You
will be looking for Scannerz Diagnostics Mode to detect
faults, which will yield messages similar to the following:
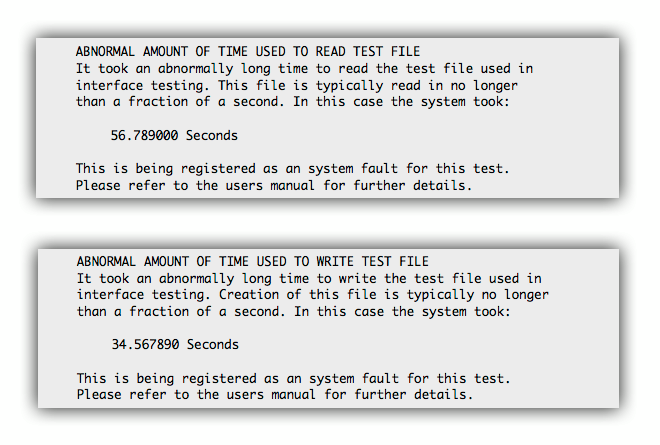
When messages similar to those above occur, you will know that
your system is experiencing system faults. If the problems can't
be correlated specifically to a cable, it's possibly a cracked
trace either on the logic board, logic board connectors, or
inside a drive housing if it's an external drive.
4. Boot from an alternate source from that used in step 1, using
a completely different type of port. Pay close attention
to points A., B., and C. above and make sure that the alternate
boot source you’re using is not a shared port from the same I/O
card or ports feeding from the same interface circuit.
For example, if the original test was done using an internal
drive with a SATA interface, use another boot volume such as a
Phoenix Boot Volume using a USB interface. If the original test
was done using a USB based Phoenix Boot Volume, then boot from
the internal SATA drive you normally use to boot the system.
Launch Scannerzfrom that, and re-perform the Diagnostics
Mode tests as identified in step 2 above to test, at a
minumum both the alternate boot source as well the original boot
source. It’s highly recommended that you perform tests of this
nature on as many I/O ports as possible, preferably all I/O
ports. The idea is make sure the problem is isolated only to a
single data path.
5.The test results should fall into one of the following
categories:
- Inconsistent errors and irregularities are present in all tests. This implies there’s a problem with the logic board or devices connected to the logic board. Improperly seated Airport cards or RAM can often cause this. In most units the RAM can be reseated, but isolating other connections will most likely require opening the unit up. It’s also possible there may be a supply regulation problem.
- The problems are isolated to a single path. This is the most common result, and in 9 out of 10 cases, it will be cable or connector related. In this case, the problem will need to be subjected to sub-isolation as described below.
- The problems appear on a group of I/O ports. This is typically a condition found in items A. and C. above. If it’s item C. it’s most often the cable connecting the I/O port to the logic board. In item A. it indicates that the USB Controller/hub chip has problems of some nature, and this is a logic board problem.
- The problems disappear completely. This occurs when the test wasn’t performed properly, there’s a problem that is beginning to surface that isn’t exhibiting problems consistently enough to be detected, or there’s a problem with a process running in the system. This can also happen when there’s a cable problem and the test is being performed with the cable in a position where full contact is being made in an intermittent break.
Resolving Problems with Inconsistent Errors and/or
Irregularities
If the results indicate that the errors and/or irregularities
are present in all tests, it implies there’s something wrong
with the logic board, or something connected to the logic board.
We recommend proceeding by attempting to start doing the easiest
things first before going into more intense work. For example,
re-seating the RAM. In some rare (very rare) circumstances an
auxiliary device, such as a printer may be causing problems, and
it might be wise to see if problems go away if other devices are
removed.
If this doesn’t provide positive results, the unit will need to
be opened up, and all internal items reseated and inspected for
damage. If the unit uses an internal supply with large
capacitors, the supply should be checked for capacitor bloating
and signs of other failure. You may very well need to replace
the logic board if this type of condition exists.
If the problems are isolated to a single path, you will need to
determine the exact cause of the problems. In most cases, it
will be either a cable, connector, or poorly seated cable in the
path.
It is not uncommon for the connectors on the logic board leading
to external I/O devices, such as USB and FIreWire ports to
develop cracks at the junction between the logic board and the
connector if subjected to lateral impact or strain. The
connector plugging into these ports can effectively act almost
like a lever which can, in a sense, “amplify” the amount of
strain being placed on the actual connectors. All tests,
regardless of the device tested on this port will exhibit the
exact same intermittent behavior. The only solution in this case
is to either replace the logic board or not use the port.
Similar problems can exist on external drive enclosures, and
generally the only solution will be to replace the interface
board in the housing.
Any cables found to be defective, whether internal or external,
will need to be replaced. External cables tend to malfunction
near the connector ends. Always check the seating of cables and
in the case of external cables, check the inside of the
connectors for possible contamination by a foreign substance.
If the problems exist on a group of I/O ports, the problem may
be cable or logic board related. If you have a unit as described
in item C. above, then the most likely culprit will be the cable
connecting the I/O board to the logic board. Attempt to reseat
the cable first to see if the problems clear up. If they
persist, attempt replacing the cable with a known good one. If
this fails, then there’s unrepairable damage either to the I/O
card or damage to the logic board path that connects to the
cable. The option will be to replace the faulty components or
simply not use the ports associated with the bad path.
If you’re using an older unit that uses a USB controller/hub
chip as described in A. above, this is logic board damage and
the only option will be to not use the ports or replace the
logic board. However, confirm that the problem exists on a host
of devices. For example, if you were to test 2 USB ports with
the same device and cable, it’s quite possible the device or
cable could be defective, thus leading you to think that all USB
ports are bad when in fact it’s the device being used in
testing.
If the problems can’t be replicated there are several
possibilities. The first is to ensure that the test is being
conducted properly. Scannerzrequires that no other
applications other than the core operating system be running. If
this condition hasn’t been met, the tests should be considered
invalid.
If the test was conducted properly, use Activity Monitor and FSE
or FSE-Lite to confirm there are no other, hidden applications
running. It may be necessary to open the log files for the
system and see if there are any tell-tale signs of
malfunctioning applications, start up items, or faulty kernel
extensions. It may be helpful to reboot the system in safe mode
to see if the problems clear up.
Finally, if there’s a problem that’s just beginning to surface,
problems may only show up once in a while. If the problem is due
to a true fault, it will eventually get worse, not better (they
never get better!) We would recommend monitoring the system and
paying attention to see if these currently rare events can be
correlated to a specific device or activity. When problems
associated with actual faults in the system are in their initial
stages of development, they may be difficult to isolate and
frustrating to deal with.
Sub Isolation of a Problem Associated with a Specific Path
If the problems have been traced to a specific path, the actual
source of the problem should be isolated. In the vast majority
of cases, cables, failing connectors, or poorly seated
connectors will likely be the cause. Much of this is nothing
more than common sense and basic logic, but it may take a little
thinking to isolate the actual cause of the problems.
To isolate this problem, first visually inspect the cables and
their connectors for any signs of damage or contamination and
repair, replace, or attempt to clean as needed. If there are no
obvious visual signs of problems, attempt reseating the cables
to see if the problem clears up. If this doesn’t work, replace
the cable with one that’s known to be in good working order.
If none of these attempts clear up the problem, you need to
start to consider the possibility that the logic board, an
external enclosure (if the path is to an external drive), or
possibly the drive itself has problems. The most likely culprits
will be the connectors on the logic board, or those on the
interface connector of an internal or external hard drive. The
only way to really evaluate this is to swap the external or
internal unit with a known good, working unit. If the problems
continue, the logic board is to blame, otherwise the internal or
external drive is to blame.
If the problems are traced to the logic board, the unit can be
run from an external drive, so it isn’t necessarily the end of
the unit. Be advised that if problems exist with an external
drive, the drive inside that unit may be in perfect working
order if the problems are associated with the drive enclosure
instead of the drive itself.
Purchasing Scannerz
To purchase one of the Scannerz packages, click on
the Buy Scannerz Now button below.
Prices:
$21.95 For Scannerz Lite
$39.95 For Scannerz with FSE-Lite,
Performance Probe, and Phoenix
$49.95 For a Scannerz with FSE,
Performance Probe, and Phoenix


